Page 1 of 3
[G-SYNC Kit] WARNING! Be careful with brown clip/blue ribbon
Posted: 16 Jan 2014, 17:01
by Solar
Just posted this in the other thread...
Solar wrote:Be very careful with the brown clip (J6) for the buttons! I watched the installation video that was posted by Nvidia just a few days ago, and the guy specifically says lift up the brown clip. Well i tried it and the whole thing came up from the circuit board!
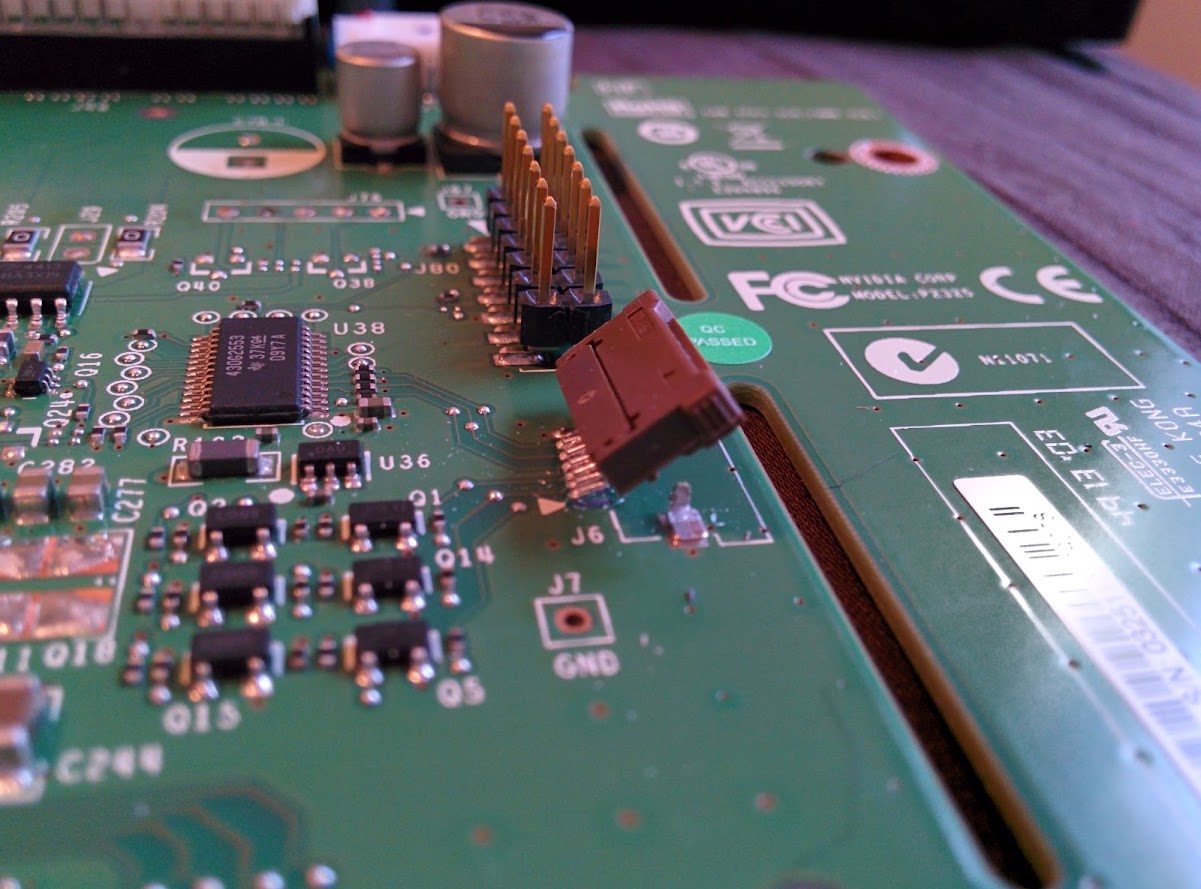

I can't believe none of the pins on the back side broke! I carefully and slowly pushed it back down and was finally able to seat the ribbon cable by pushing it in while holding the clip down at the same time.
Luckily all of the buttons work as well as the led power button and i'm using it right now.
[Moderator's Edit: NVIDIA recommends that you never use tools to try and open it -- this is a very fragile connector, and the biggest point of risk during the G-SYNC. It's a multiple-step disengagement; slide then flip open. The brown tab pulls away horizontally first popping up diagonally. We're trying to obtain close-up photos to make this step easier and safer.]
Re: WARNING: Be careful with brown clip [G-SYNC Upgrade Kit]
Posted: 16 Jan 2014, 17:08
by Chief Blur Buster
Solar, I've given you a brand, whole, new thread about this -- to help catch people's attention.

When people ask about this clip, just post a link to this thread
Code: Select all
http://forums.blurbusters.com/viewtopic.php?f=5&t=194
And we can warn a few people about being careful about this!
__________
And, whew!
You got lucky; glad it works!
To other people: When you pry this, be very careful that you flip upwards the correct part (top part), not the WHOLE connector, or this happens! Additional tips are welcome.
Re: WARNING: Be careful with brown clip [G-SYNC Upgrade Kit]
Posted: 16 Jan 2014, 17:40
by Solar
Thanks Chief.
I got lucky indeed. It seems like you have to slide the clip towards the closest edge of the circuit board, and then it will flip up. Now I know.
Anyone installing this DIY kit should slide this clip out before mounting the PCB. It's kind of hard to get at otherwise.
Re: WARNING: Be careful with brown clip [G-SYNC Upgrade Kit]
Posted: 16 Jan 2014, 18:35
by nimbulan
It really makes me wonder why they didn't mount it closer to the edge of the PCB like on the original board. It would be a lot easier to work with.
Re: WARNING: Be careful with brown clip [G-SYNC Upgrade Kit]
Posted: 17 Jan 2014, 17:31
by Ch0b0
I had the same issue, except one of the traces popped up off the PCB! It still makes a connection, so it works. I'm assuming this is just the connection for the menu buttons?
Re: WARNING: Be careful with brown clip [G-SYNC Upgrade Kit]
Posted: 17 Jan 2014, 17:33
by Chief Blur Buster
Ch0b0 wrote:I had the same issue, except one of the traces popped up off the PCB! It still makes a connection, so it works. I'm assuming this is just the connection for the menu buttons?
Ouch! Sounds like multiple people got caught by this nasty gotcha.
Yes, that's correct. If it breaks, you won't be able to use any of the above.
If it acts up later (e.g. monitor bumped and a button stops working), then you can fix it by gently tapping the broken connector with a hot, sharp-pointed soldering iron (a good one is easily purchased for well under $50).
WARNING! Be CAREFUL when installing G-Sync! Easy to damage!
Posted: 17 Jan 2014, 20:11
by zachska87
As a winner of one of the DIY kits, I just finished assembling the monitor. I will post a full report and documentation tomorrow, but a word of warning to anyone attempting the DIY...
Be VERY careful when reconnecting the blue ribbon cable that carries the button signals!!! During the install, with very little force, I accidentally snapped the brown female connector off of the board. At this time, though I am using the monitor now, none of the front buttons are operational. I fear it may be permanent damage and I am not entirely sure how I am going to fix it yet. Unfortunately, this also means I am not able to test ULMB.
I just want to make sure that anyone else putting these together sees this before I get my documentation up.
Also, the power connector cover is not tabbed and I had to use duct tape to install it. Otherwise a fairly smooth install. I will post documentation in a new post tomorrow.
Re: [G-SYNC Kit] WARNING! Be careful with brown clip/blue ri
Posted: 17 Jan 2014, 23:18
by Chief Blur Buster
Just made this a sticky, for the interim.
If it bites two people in two days, this is going to be a common problem -- NVIDIA may need to improve instructions.
I'm looking for someone to take these photos while installing Kit
I need time lapse step-by-step photographs of disengaging the brown connector and re-engaging the brown connector, with full commentary.
photo1: empty brown socket
photo2: touching brown socket in correct location (fingers) -- do not use tools.
photo3: sliding clip on brown socket properly
photo4: properly flipping clip upwards
photo5: connecting the blue ribbon cable
photo6: re-engaging the clip on brown socket
photo7: brown socket with blue ribbon cable
(or more than that, but you get the idea)
These step by step photos will teach people how to properly attach ribbon cable to the brown socket.
The above will help save others from trouble
Re: [G-SYNC Kit] WARNING! Be careful with brown clip/blue ri
Posted: 17 Jan 2014, 23:49
by zachska87
The answer is that the brown tab pulls away horizontally first BEFORE it pops up diagonally. The NVIDIA instructions are not clear about this at all. Unfortunately it's now too damaged to work properly. Will try to get repaired and post then.
Re: [G-SYNC Kit] WARNING! Be careful with brown clip/blue ri
Posted: 18 Jan 2014, 00:58
by Chief Blur Buster
zachska87 wrote:The answer is that the brown tab pulls away horizontally first BEFORE it pops up diagonally. The NVIDIA instructions are not clear about this at all. Unfortunately it's now too damaged to work properly. Will try to get repaired and post then.
Does your G-SYNC kit include a way to contact NVIDIA?
Before you open up, you might want to do some G-SYNC specific tests and play around with just G-SYNC for now.