blargg wrote:I've been following this work for a while and I recently got my first LED-backlit LCD, an Acer S271HL bid. After
repairing the backlight driver board's vias, I hated how bright it was and while modifying it to lower the PWM rate, I figured I'd try a pulsed backlight, not expecting it to work very well. I've been amazed at how well it worked, and how little artifacts there are.
Excellent, you are one of the few DIY strobe backlight modders to have successfully followed the
HOWTO: Electronics Hacking: Creating a Strobe Backlight.
blargg wrote:This is a 60Hz monitor and the pulsed backlight flickers like crazy with lots of bright windows open, but is hardly noticeable for retro video games full-screen.
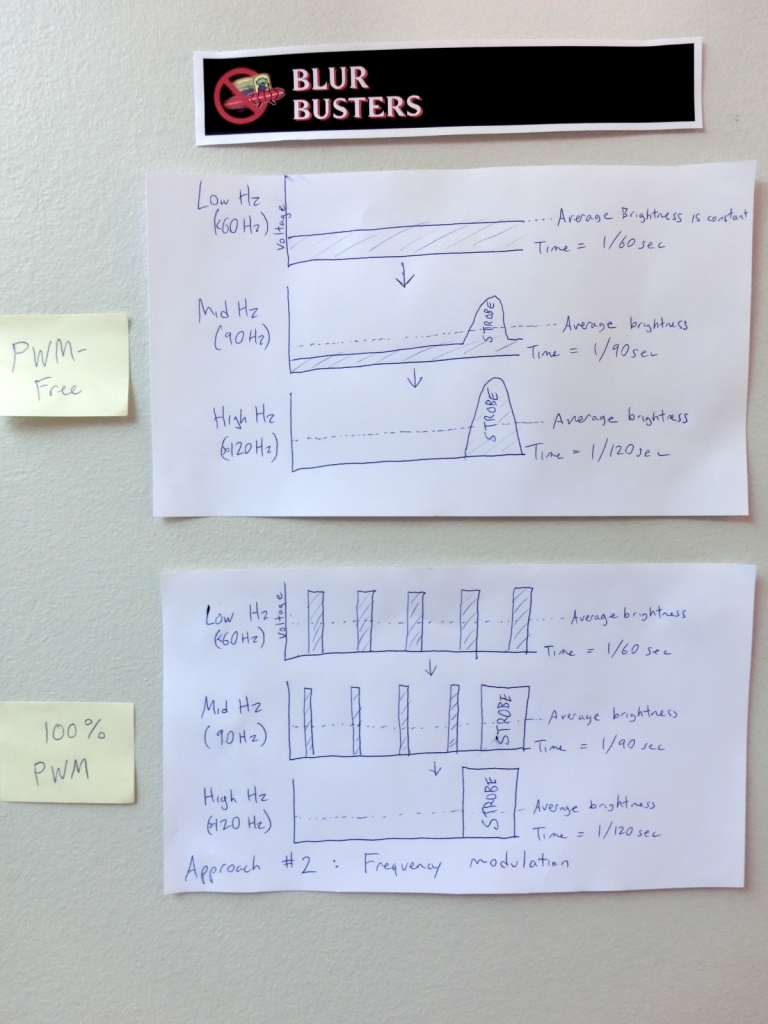
The single pulse per refresh is the major piece of the puzzle to eliminate LCD motion blur. But as you know, at 60Hz, that can flicker like crazy! That's why the
commercially developed strobe backlight often recommend running at 120Hz, and some of them don't even let you use a lower refresh rate.
blargg wrote:I'm very surprised that the LCD updates things so quickly. At first when I tried it, I just had a 1ms strobe at 60Hz without sync. Even then the glitchy tear when showing full-screen horizontal scrolling images was less than 10% of the LCD height. It's as if the LCD is refreshing everything in a ms or two.
Modern TN LCDs refresh fast enough to gain stunning benefit from strobe backlights nowdays, so it is not surprising.
If your LCD controller is very flexible with timings -- try playing with PowerStrip/ToastyX/NVIDIA Custom Resolution and enlarge the vertical blanking interval. You can completely hide this by using a large vertical blanking interval, a vertical blanking interval of 2-3ms will ofte completely hide 99%+ the GtG transitions of a typical 1ms TN display. Assuming your LCD scanout is synchronized to the dotclock (like on some modern TN monitors like the BENQ Z-Series), you get an accelerated LCD scanout followed by a longer pause between refresh cycles.
This is the "Vertical Total" trick. You may have seen other forum posts about this elsewhere in Blur Busters Forums; This is called the "Vertical Total 1350" trick used by BENQ Z-Series monitor users, to reduce this strobe crosstalk. That's because 1350 scanlines are output -- 1080 visible scanlines of pixels and 270 blanking interval scanlines (1080 + 270 = 1350), for a dummy delay of 270/1350ths of 1/120sec (this turns out to be ~2ms) which is good for letting GtG pixel transitions settle before the next refresh cycle begins. Your display may work with smaller or larger vertical totals, but it's excellent for hiding strobe crosstalk (fuzzy/glitchy tearline) on LCD controllers/displays that refreshes in sync with the dotclock (and accelerates scanout at higher dotclocks, making longer pauses bewteen refresh cycles convenient for letting GtG settle before flashing the backlight).
If you have control over strobe timing -- then you actually want to strobe a little bit late; e.g. turn on after the vertical blanking interval already started, and turn off after the vertical blanking interval already ended. An approximately +0.5ms offset works well. This is because of the 'lag' of visible pixel transitions after the electronic actuation of LCD pixels. So if you're able to adjust the timing (phasing) of the PWM pulses, make them strobe ON roughly halfway into the VBLANK, then strobe OFF roughly ~0.5ms after VBLANK finished and next refresh already started. In the real-world, this strobe timing plus the GtG lag will align the blurry tearline in the middle of the blanking interval, rendering it invisible.
blargg wrote:I took some pursuit pictures by repeatedly manually moving the camera along with the UFO and finally getting a well-tracked photo. You can see by the four after-images of the text below in both that tha camera (iPhone 4) was using a 1/15 sec. shutter.
Good job with the pursuit photos! You will find it easier to do the pursuit photos if you turn on the temporal test pattern (Pursuit Camera Sync Track) --
http://www.testufo.com/ghosting#pursuit=1
Even if you don't use a rail, the sync track still makes iPhone hand pursuits much easier because you can line-up the 'tickmarks' and more easily verify your resulting photo is an accurate pursuit if the tickmarks lines up in the photo. Try it!
HOWTO: Pursuit Camera with Blur Busters Motion Tests (still appliable for hand pursuiting a camera -- even using an iPhone).
But good job on hand-driven pursuit camera!
blargg wrote:It seems mainly that the overdrive is leaving (slight) artifacts, but there's no option to disable them
Overdrive is extremely hard to calibrate for strobe backlights, as without overdrive, pixels may not transition fast enough, but with overdrive, you get razor-sharp ghost afterimages (clear overdrive artifacts) instead of motion-blurred overdrive artifacts).
Specialized strobe backlight monitors often use custom overdrive algorithms optimized to strobe backlights, and some of them do a really good job.
blargg wrote:As for vsync, I was fortunate that the monitor's PWM signal re-synchronizes itself at the beginning of each frame. There is a slight timing abnormality in the PWM period at vsync that I watch for every frame.
That is quite convenient; so it's simply modding the PWM to do one pulse per refresh. Your next challenge is to try to shift the phasing of the PWM pulses; see if you can make the first PWM pulse overlap the end of the blanking interval (ON somewhere during VSYNC, OFF early during next refresh cycle). This will hide most of the strobe crosstalk (blurry tear effect) between refresh cycles. Is there a way to have the electronics let you do it easily, perhaps via inserting an adjustable trigger delay circuit?
blargg wrote:At this point after working on this for the day, the brightness control at 50-100 gives normal 1kHz PWM dimming, with 50 giving a really dim display, and 100 full brightness. Brightness 49 gives a really dim display, but is in strobed mode (1ms strobe). Brightness 0 gives maximum strobed brightness (5ms strobe).
When strobing a backlight at one strobe per frame/refresh, strobe length equals display persistence. It will follow the what I now call the
Blur Busters Law Of Persistence -- 1ms of strobe length equals 1 pixel of motion blurring during 1000 pixels/second. This is easily observed during
http://www.testufo.com/blurtrail -- moving line becomes 1 pixel thicker for every 1ms extra you add to the strobe length, during the default motion speed (960pix/sec, similiar to 1000pix/sec). Obviously, you end up having a brightness-versus-persistence tradeoff.
A really good test is the
TestUFO Panning Map Test at very fast motion speeds; the street names become more readable at shorter strobe lengths (lower brightness), and is completely unreadable when not strobing.
BTW, 1ms strobe length is not even the final frontier! At 3000 pixels/second, I am able to visually tell apart 0.5ms and 1.0ms which is rather impressive. (This translates to 1.5pix versus 3.0pix motion blurring during 3000 pixels/second panning speed, which is roughly the fastest panning speed my eyes can accurately track on a 1080p display at 1:1 view distance -- see for yourself in the
TestUFO Panning Map Test (3000 pixels/sec) if you don't believe you can tell apart 0.5ms and 1.0ms strobe length). Based on this, and according to my math calcuations, motion clarity benefits will still occur all the way down to 0.1ms-to-0.2ms strobe length, especially when we strobe wide-FOV 4K displays (e.g. 4K virtual reality goggles covering a wide FOV) that allow accurate eye tracking all the way to 10,000 pixels second (0.1ms per pixel = 1 pixel of motion blurring). At such short strobe lengths, massive amounts of brightness is required in the strobes to compensate for the long dark periods -- otherwise it's quite unusaby dim! But when you're emulating old 8-bit games, often low resolution, a good 1ms or 2ms strobe length is all you need, because you have very few pixels to motion-blur at typical maximum eye-tracking speeds.
BTW, congratulations on your successful DIY strobe backlight modification of a cheap computer monitor! As you can see, it's simpler than you expected.


