Hand-Waved iPhone/Android Without A Rail
First, let's explain the invention.
A Blur Busters display testing invention by me -- that some of you may be familiar with the Pursuit Camera Instructions. Background info: NOKIA, NIST.gov, and KELTEK researchers have a co-authored conference paper here:
With a rail, one can capture really good pursuit camera photographs like this:
Even though this is much less expensive than commercial equipment -- not all readers can afford a camera rail.
But, in case you didn't know yet.... Display motion blur photography can be done without a rail now, for enduser/amateur purposes.
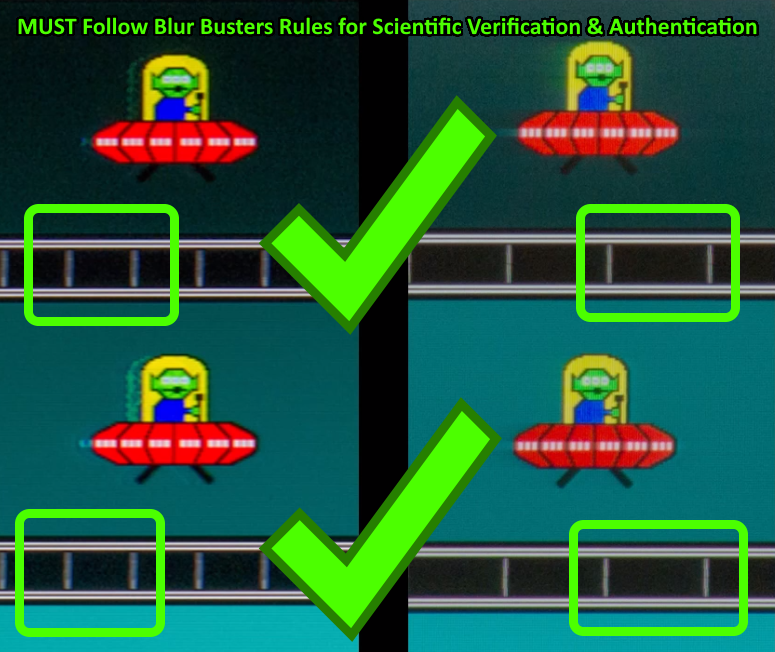
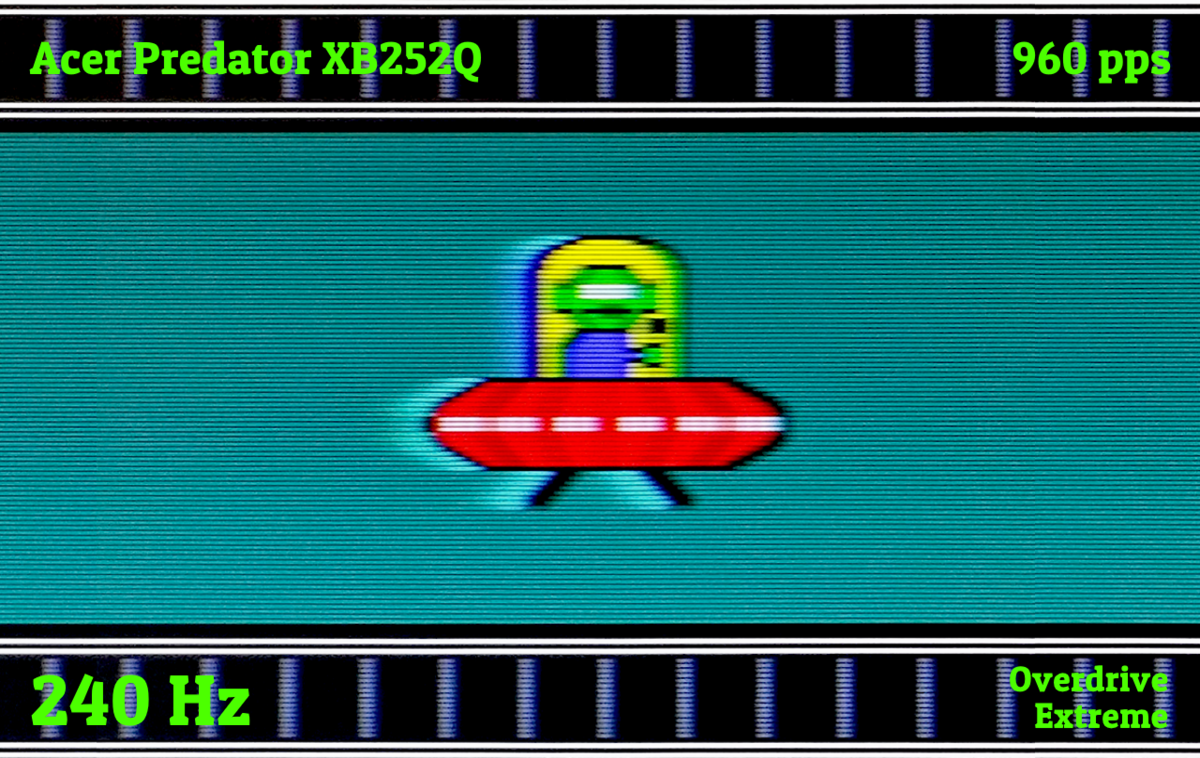
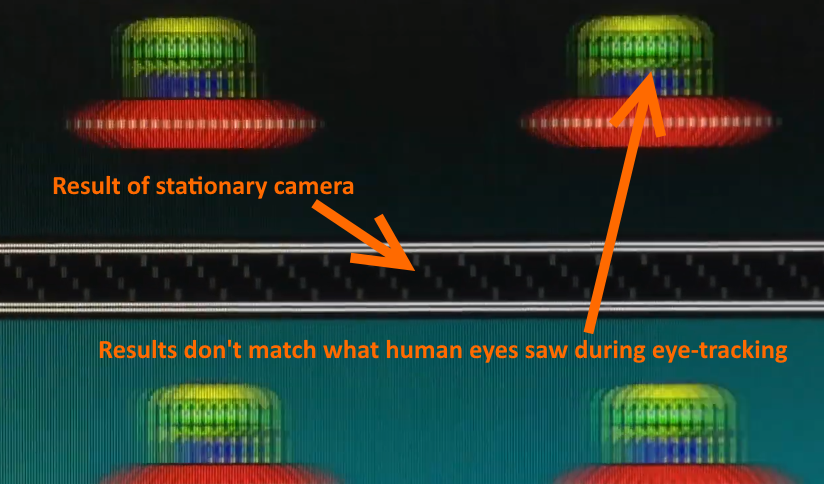
Now if you see the TestUFO ghosting, you'll see my temporal test pattern invention (the tickmarks that forms a horizontal ladder when eye-tracking the UFOs)
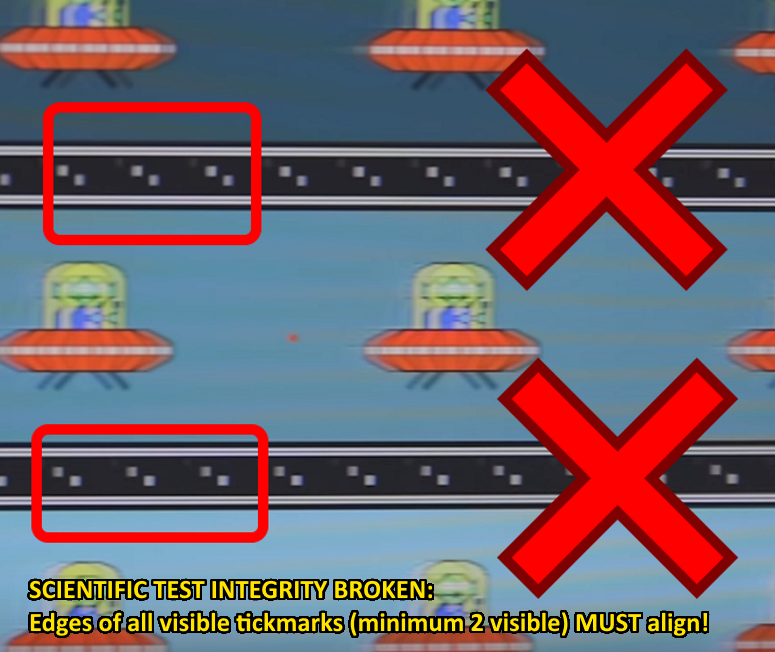
1. Stationary gaze: The sync track is disjointed/broken.
2. Eye-tracking the UFOs: The sync track aligns into what looks like a horizontal ladder.
If you try to photograph it stationary, the photograph is inaccurate for the eye-tracking situation (display motion blur behaves differently while eye tracking, see ww.testufo.com/eyetracking ... It's the sample-and-hold effect)
Instructions for easy pursuit camera with smartphones. No rail needed:
1. Go to www.testufo.com/ghosting and put it in full screen mode.
2. Start your camera and then tap-hold the screen to lock your autofocus to close-range (easier to do in stationary text at top of TestUFO). Set exposure to 4x refresh cycle, e.g. 1/30sec for 120Hz, or 1/60sec for 240Hz
3. Start recording video with your smartphone
4. Hand-pan the camera sideways a few times, and you'll see the sync track
Just like this video:
https://www.youtube.com/watch?v=8503K9EmUtU
(You can freezeframe this video and use the , and . hotkeys to single-step to clearest freeze frames.)
Many can do much better than this low-quality video (a random "first try" on an old iPad mini); however, this video demonstrates how much more accurate even a bad pursuit camera (end-user motion blur photographing) can be than a static camera.
You can observe how WYSIWYG the horizontal ladder is -- and ghosting streaks are. This is just an iPad camera at default settings, not even using the "Pro Camera" app that lets you set camera exposure length. Full camera adjustment (exposure, white balance, etc) is preferred for more scientific results. However, in a pinch, this is great for remote troubleshooting -- aka end-user ghosting-artifact troubleshooting.
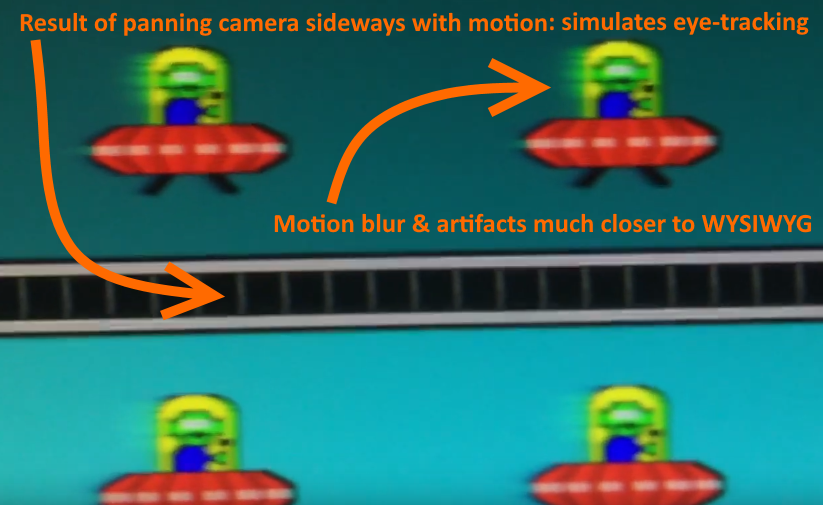
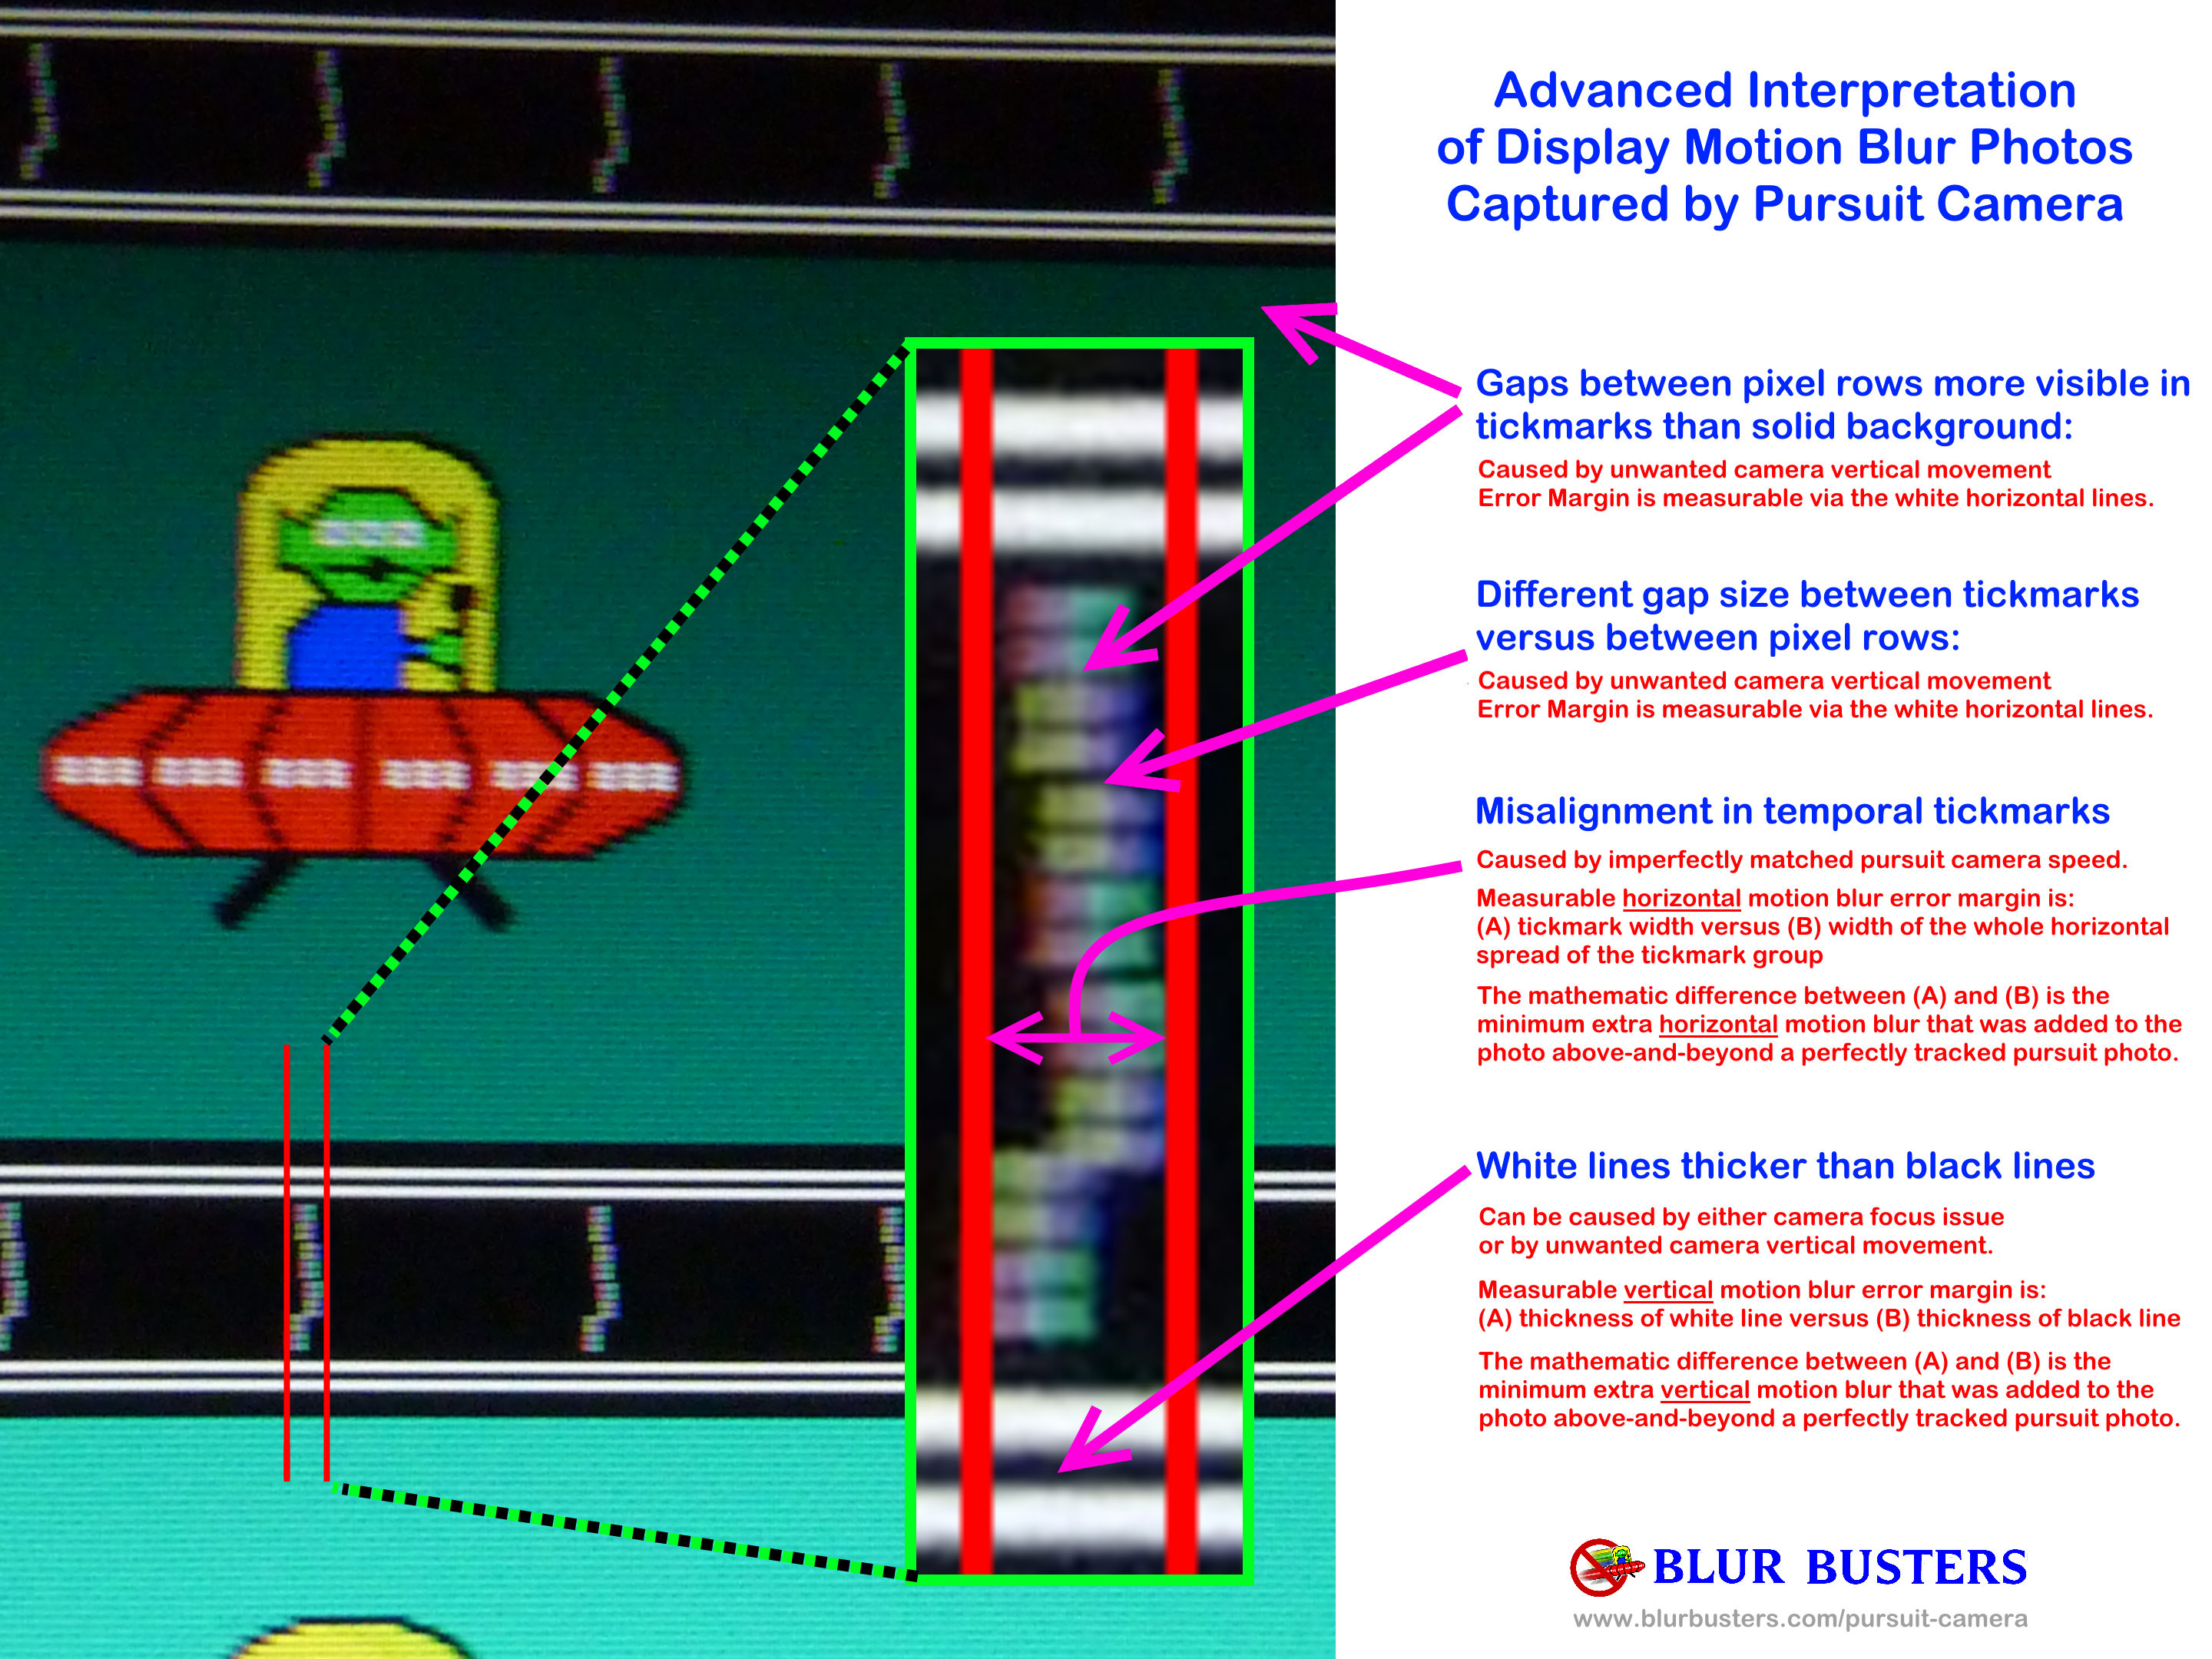
Certainly, these are not perfect (e.g. smartphone focus issues, shaky hands, etc), but it is a clear demonstration of how a moving camera lens (tracking motion) is a better equivalent of a moving eyeball (tracking camera). Ideal exposure for a pursuit camera is approximately 1/30sec (or four refresh cycles at 120Hz) -- roughly matching human vision integration times -- but there's some leeway for deviations from this, with increasing error margins.
Now you understand pursuit camera! And it's easy to learn.
This can kind of be done with other TestUFO patterns such as www.testufo.com/eyetracking and www.testufo.com/persistence although without a sync track, it's not as easy to aim the speed of the camera.
But for troubleshooting simple motion blur behaviours (e.g. helping a user), it can still have enough visual data to be useful. Here's an example of 120fps having roughly half the motion blur of 60fps, and 240fps having roughly half the motion blur of 120fps. Exactly as you saw in person. (Note: GtG limitations start limiting differences, as refresh durations get shorter, so faster GtG will amplify differences between 120fps and 240fps).
While not as accurate as a rail, it's very clear that that the different framerates have different motion blurs, in an uncannily accurate match to what your human eye saw during eye-tracking.
Further Advanced Reading
For more reading about pursuit camera photography
Want to read more?
- See pursuit camera thread,
- See Display Testers/Reviewers using our pursuit camera technique
- See Full Instructions For Pursuit Camera
- See My Pursuit Camera Paper (peer reviewed) -- I'm the co-author. Co-authored with NOKIA, NIST.gov and KELTEK, and conference paper is on ResearchGate by yours truly Mark Rejhon (Chief Blur Buster).
This test is currently adopted by RTINGS.com, HDTVtest.co.uk, HDTV Poland, TFTCentral.co.uk, and other sites.
But even you, can practice pursuit photography to accurately capture a relatively accurate WYSIWYG approximation of human-perceived display motion blur! Most of them use a rail, but some now do it raillessly and single-step through the frame to find the most accurate freezeframe -- free pursuit camera photography using just your smartphone and your hand!
(If you run a commercial site, and decide to use a pursuit camera -- just remember to credit Blur Busters for the invention and link to us -- and please consider using a rail for improved accuracy. That said, it is indisputable that even hand pursuits can produce more accurate WYSIWYG display motion blur effects than stationary photography.)
UPDATE: Improvements to instructions
The newer iPhones, such as the iPhone 16 with 4K 120fps HFR video is perfect for tripodless handwave pursuits.
You can even attach an SSD thumbdrive (1GB/sec) to the iPhone 16 USB-C port, for uncompressed 4K 120fps video!
Thanks to good optical image stabilization and lack of vibrations in a very careful iPhone handwave (multiple repeat passes, while recording video, as a defacto burst shoot), handwaves can often scientifically statistically outperform versus cheap rail setups that vibrate too much on shaky tripods, or flex with heavy cameras. The sync track is the proof of accurate tracking, regardless of how the camera was tracked (automatically, manually, rail, rotary, or handwave).
My iPhone 14 Plus outperforms most tripod-based pursuit cameras now, because of these factors, where shaky tripods, slide vibrations, and flexible rails can create error margins bigger than 5 minutes of handwave pursuits by 10,000-freezeframe bruteforce (scroll through video slider, find clearest freezeframe, save freezeframe). Good heavy rails and high-end sliders will outperform, but my handwaves outperform 90% of reviewers.
Also:
Chief Blur Buster wrote: ↑01 Apr 2020, 00:19Here are improved instructions that works with many "Professional Camera" apps in Google Play and iPhone App Store. Such as "DSLRCamera" on iPhone.
Setting Up Your Smartphone For Easy Hand-Wave Video Pursuit Camera
(The video file can be kept, it can be quite educational showing people how a pursuit camera works -- the video file shows self explanatory behaviours -- it instantly tells the users that camera tracking is the same thing as eye tracking -- where tickmarks looks bad until the camera goes at the same speed as the UFOs -- just as if you did WYSIWYG).
- Go to Google Play or iTunes on your smartphone
- Download and install a high-rated professional SLR-like Camera App that allows you to do manual-everything during video
- Run www.testufo.com/ghosting
- Configure video camera app to FIXED EXPOSURE (Prefer 4 refresh cycles, i.e. 1/30sec 30fps for 120Hz)
- Configure video camera app to FIXED COLOR TEMPERATURE (6500K)
- Configure video camera app to FIXED FOCUS (with phone arm's length away from monitor)
- Configure video camera app to ISO to brighten as needed. If too dark/noisy or bright/overexposed, brighten or darken monitor brightness setting if you want to save time fiddling or if your camera app has no ISO setting.
- IMPORTANT: Do not bring camera too close to the monitor (blurry) -- back away slightly and use a little bit of zoom (sharper). Most phones don't macro very well without using the backaway-and-zoom trick. Due to phone resolution, backing to arm's length may not be practical, but please use minimum 6" or 15cm, preferably at least 12" or 30cm. Your pursuit camera will be more accurate if you use more similar camera-distance as eye-viewing distance. Focus will be about 10x+ sharper than bringing phone too close to screen.
- Finally, configure video camera app to a BRIGHTNESS or ISO SETTING that doesn't underexpose/overexpose per frame.
(Note: Framerate doesn't matter as much as ability to adjust camera exposure per frame, you may have to configure the camera frame rate in order for it to let you adjust the exposure settings the way you want it. Also, not all camera video recording apps lets you configure everything, so you may have to experiment with different apps until the app lets you correctly configure the video settings).- Start video recording. (Note if image is too bright or too dark,
- Hand wave the video a few times just like the YouTube video embed, from about arm's length away
- If you need more steadiness, try stiffening your arm, holding phone with both arms and swivel your computer chair instead
- Afterwards, play the video using a good single-frame-stepping player app (if using smartphone, use a video player app that has a touchscreen jog slider, combined with PREV/NEXT framestep buttons) to find the clearest freezeframe.
- You've found your good smartphone hand-pursuit photo (simply buy using video as an equivalent of photo-burst-shooting to maximize odds of a good pursuit photograph). Save the freeze frame as a photo. This becomes your good pursuit photo.
- Done!