Re: BENQ XL2720Z 27" of goodness :)
Posted: 17 Jan 2014, 15:43
Great. I can't create custom resolutions with Surround 
Who you gonna call? The Blur Busters! For Everything Better Than 60Hz™
https://forums.blurbusters.com/
Can you at least temporarily undo surround, and test on one monitor? I want to post the news on Blur Busters about a temporary XL2720Z fix that doesn't require waiting for the firmware upgrade. I don't want to have to downgrade my BENQ XL2720Z to verify.GitDat wrote:Great. I can't create custom resolutions with Surround
Unfortunately it doesn't workChief Blur Buster wrote:Here is a temporary workaround to reduce BENQ strobe problem (I think)
Going to NVIDIA -> Create Custom Cesolution
-- Set Refresh Rate to "101Hz"
-- Change Timings from "Auto to Manual"
-- Set Vertical Total to "1350"
-- Click "Apply"
-- Switch to "101Hz"
This creates a large 270-line blanking interval between refreshes, which adds a good 2 millisecond delay betwen refreshes. This fits more of the 1ms-2ms pixel transition during the pause between refreshes. In this case, this actually greatly reduced strobe-backlight ghosting a lot, because more of the pixel transition fit inside the blanking interval. That pushes the strobe phasing to be more timed with the vertical blanking interval.
You can't do this at 120Hz because it's literally consuming the dotclock bandwidth of 1350p just to do 1080p, but you can do it at a lower refresh rate, such as 101Hz.
Can you specific about "doesn't work" in what way?LogicElite wrote:Unfortunately it doesn't work
I created the custom resolution and set the vertical total pixel to 1350 and the hz at 101. No blackscreen but I still have the ghosting on the blur trail from the top to the bottom. The only difference is that the line goes slower since the refresh rate is at 101hz.Chief Blur Buster wrote:Can you specific about "doesn't work" in what way?LogicElite wrote:Unfortunately it doesn't work
Do you get a black screen?
Do you still get ghosting?
There will be some bit of ghosting at top/bottom, but the ghosting will disappear from the middle of the screen.
Actually, that's normal to always have ghosting.LogicElite wrote:I created the custom resolution and set the vertical total pixel to 1350 and the hz at 101. No blackscreen but I still have the ghosting on the blur trail from the top to the bottom. The only difference is that the line goes slower since the refresh rate is at 101hz.
Chief, in fact, even with these parameters on the quebec image, I can see the a light red offset from red structure when motion blur is enabled. I tried to take a picture with my digital camera without success.Chief Blur Buster wrote:Actually, that's normal to always have ghosting.LogicElite wrote:I created the custom resolution and set the vertical total pixel to 1350 and the hz at 101. No blackscreen but I still have the ghosting on the blur trail from the top to the bottom. The only difference is that the line goes slower since the refresh rate is at 101hz.
The point is you want to push the worst ghosting off the edges of the screen as much as possible. With larger blanking intervals, there become thinner bands of worst ghosting at the very top/bottom edges.
When you view http://www.testufo.com/photo (with this custom 101Hz mode) with the photo scrolling across the middle of your screen, is the ghosting much better than during your default 120Hz mode?
You need to pursuit the camera. Turn on the Pursuit Camera Grid, then take a picture while moving the camera sideways. A tracking camera more accurately simulates tracking eyes. It works best when you follow the pursuit camera instructions, but hand-pursuiting the camera has sometimes worked.LogicElite wrote:Chief, in fact, even with these parameters on the quebec image, I can see the a light red offset from red structure when motion blur is enabled. I tried to take a picture with my digital camera without success.
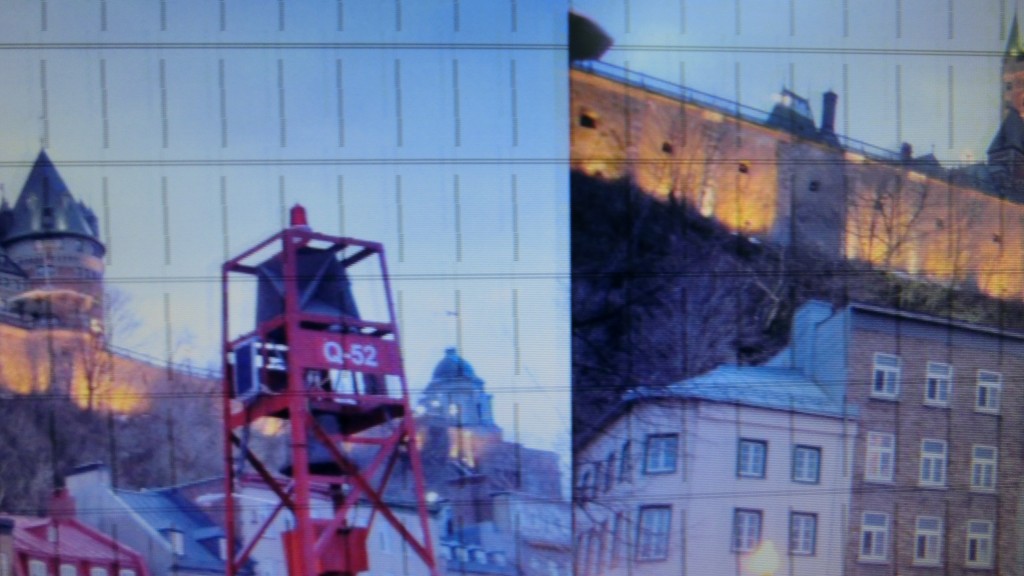
Ok is not perfect (taken from a Canon PowerShot SX210 IS) but you can notice the offset on the red structure.Chief Blur Buster wrote:You need to pursuit the camera. Turn on the Pursuit Camera Grid, then take a picture while moving the camera sideways. A tracking camera more accurately simulates tracking eyes. It works best when you follow the pursuit camera instructions, but hand-pursuiting the camera has sometimes worked.LogicElite wrote:Chief, in fact, even with these parameters on the quebec image, I can see the a light red offset from red structure when motion blur is enabled. I tried to take a picture with my digital camera without success.
1. Turn on pursuit camera grid, example http://www.testufo.com/photo#pursuit=1
2. Set camera exposure to three or four refresh cycles long (1/30sec for 120Hz)
If you can't get an exact exposure, you can get close to this by playing around with exposure compensation & screen brightness
3. Pan the camera sideways while taking a picture (this simulates tracking eyes more accurately)
4. If the grid look bad, repeat step 3 until the grid looks reasonably good (less than 1 pixel offsets in alignment)
5. Post photo.
More complicated instructions are found in the pursuit camera instructions, for a better understanding of how this works.
Example hand-panned pursuit camera photo of http://www.testufo.com/photo
This is a photo of LightBoost/ULMB, camera panned by hand (rather than camera rail). Strobe crosstalk is very minor in this photo (see vertical edges).
